In this article, we will learn how we can use the temporary table as a form datasource in D365. In our scenario, we will populate the temporary table at runtime and bind it with the form datasource. firstly, we will pass an argument on the clicked event and write the form datasource init method to populate the data in it. In our scenario we will work on the CustTable form, we will populate the customer group in the temporary table which we create on the selected customer while clicking the button. Step 1: Create a new table of type TempDB and add two new fields i.e., CustGroupId and CustGroup. Step 2: We will create a new form with the pattern (List Type), then add our previously created temporary table as a datasource, and then drag both the fields CustGroupId and CustGroup on the form grid part. After the form creation, we will also create the display menu item of type form and use our form on it. Step 3: We will create an extension of t...
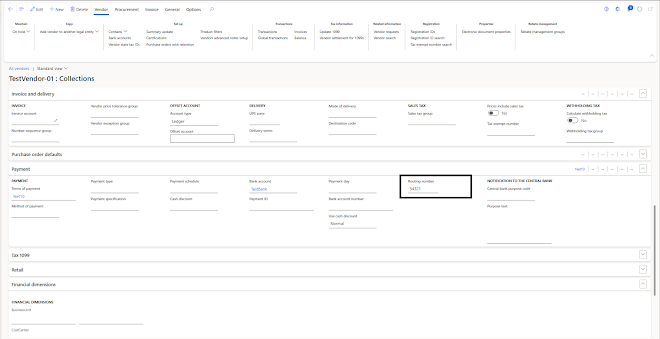
In this article, we will learn how to add a field to the VendTable form in Dynamics 365 using the display method and the alternative of using view. The field would be populated on two different locations whose navigations are as below:
Navigation 1: Account payable -> Vendors -> All vendors
Navigation 2: Account payable -> Vendors -> All vendors -> Payment tab
Add field using Display Method
Display Method:
Any method which has a display keyword as a modifier is a display method. You can use the display method on formdatasource, tables, and forms. Display methods are used where we want to show additional information on the forms or reports such as field computation, getting value from different tables without creating active relationships on the datasource level, and so on.
Step 1:
We will create an extension of table VendTable and after creating an extension we will create a COC of the table which contains our custom display method. To improve the performance of a display method we will use a descriptor to cache the previous records
[ExtensionOf(tableStr(VendTable))]
internal final class HMVendTable_Extension
{
    [SysClientCacheDataMethodAttribute(true)]
    public display BankRegNum getRoutingNum()
    {
        return VendBankAccount::find(this.AccountNum, this.BankAccount).RegistrationNum;
    }
}
Step 2:
In the first step we have created a display method, now we will use this display method on the form, for that create your new string control on the form extension and set the following properties:
- Datasource: VendTable
- DataMethod: HMVendTable_Extension.getRoutingNum
- CacheDataMethod: Yes
Step 3:
Re-build the solution, and then go to the browser to test the customization:

Add field using View
When we use the display method on the grid there are some disadvantages, such as not being able to filter data on the display column and reduced performance when dealing with a large amount of data on the grid. To overcome these issues, we can make the grid filterable column using view, Here are the steps to follow:Step 1:
Create a view with the tables from which we retrieve the field to be used in place of the display method and the field needed to establish a relationship with the form's parent datasource.
Step 2:
Create the VendTable table extension and add the relationship between the view we have created and the base table (VendTable).
Step 3:
Add the view we have created as a datasource on the VendTable form, create the join with the primary datasource (VendTable) on the view, and also add the field to the form grid.
Result:


Comments
Post a Comment